
Web Scraping NBA Stats in Python
using Selenium and Beautiful Soup

Getting the right data is hard. In fact, it’s almost always the hardest, longest, and most arduous part. I recently needed to get a huge amount of NBA stats for a project I’m working on. I knew the information existed, spread across a number of publicly available websites, but I had no easy way to directly access it. The answer was web scraping. If you are interested in following along step-by-step, you can find a jupyter notebook in my github repo that has everything you need to run the code yourself.
Note: this article assumes a basic understanding of python.
In this article I will demonstrate a simple web scraping example for anyone who might be new to the process. It can seem daunting at first, but with a little bit of know-how it’s very manageable. Today’s example involves NBA stats, but the web scraping techniques I cover can be applied to most situations. It is worth noting that web scraping is rarely the first resort. If the website has a functioning API, then that is typically a much faster and easier way of getting the data you need. But there are a few problems with APIs. It may only allow you to get certain types of data, or may not include everything you need. Additionally, companies and services can change or end API access without warning. Nonetheless, always check for APIs first.
Web scraping is the process of accessing a webpage, and pulling (or scraping) the information you want from it. If you only need a little information from just a page or two, it is easy enough to transcribe whatever you need. The real power of web scraping comes from the ability to automate the process in order to gather huge amounts of data.
While web scraping is a powerful tool, there are several dangers to consider. One is legality. Web scraping is currently legal across the US, as long as the information is publicly available. This is an important distinction. If it is information on a website that anyone can access, does not contain confidential data, and does not require any kind of login or account, then it is likely fine to scrape. If one of those conditions is not met, then you need to be very careful about what kind of information you are trying to collect.
Another danger is possible damage to the person or company who owns the site. Web scraping involves making calls to the server that is running the site. If done incorrectly, web scraping code can make rapid, repeated calls to the server, slowing down the site’s performance for all users, and in extreme cases, can temporarily shut down a website.
It is also considered good practice to check the site for any policies or TOS related to web scraping, even if the information is publicly available. My web scraping example comes from basketball-reference.com. They are the go-to site for any data-loving basketball fans, and have a massive amount of data. They also have a set of policies on web scraping that can be found on their parent company’s website here.
According to their policies, you can web scrape as long as you meet a series of requirements, including:
- not using the data for illegal activites
- not adversly impacting the performance of the website
- not using the data for profit or to create a competing product
Since today’s example is just some boxscore data from a single NBA game, we are in the clear.
The first step is to find the information we want to scrape. For this example, I’m interested in getting the boxscore stats from what is considered by many to be one of the greatest basketball games of all time: Celtics vs. Suns Game 5 of the 1976 NBA Finals. After navigating the site, I manage to find what I’m looking for: Game 5
You can save yourself a lot of time and frustration by being certain what kind of information is accessible on the webpage and what exactly you need from it. There’s a lot of information available on this webpage, but I’m only interested in the boxscores for each team. Now that I have identified the data I need, we can get our code ready to scrape it.
I will be using two main packages: Selenium and BeautifulSoup. Check the links for documentation or if you need help installing them. It is worth noting that the web scraping I’m about to demonstrate could be done using either package by itself, but I will introduce both since they are the two premier web scraping packages. In general, Beautiful Soup is easier to use, but has less functionality than Selenium.
To start, I need to import the necessary packages:
from selenium import webdriver
from bs4 import BeautifulSoup
import pandas as pd
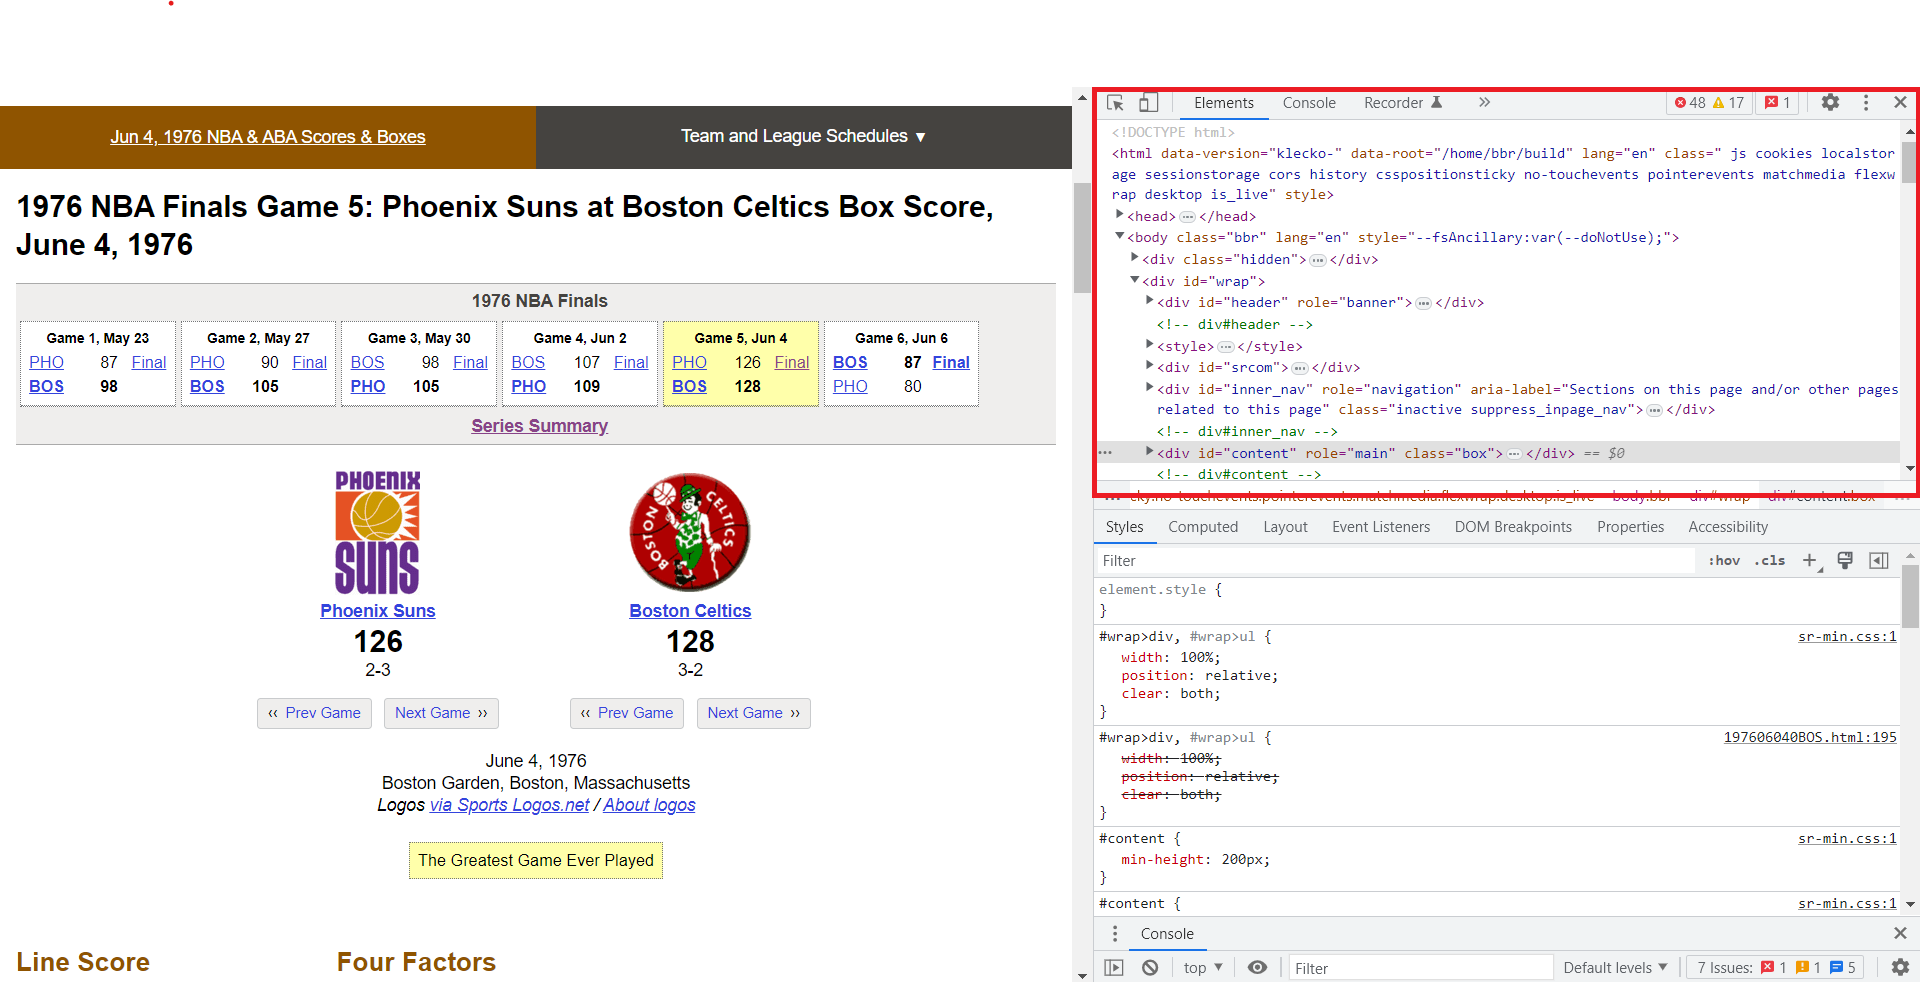
Now I need to take a closer look at the webpage. Interacting with the various elements of the webpage requires a little knowledge about how a webpage is displayed, but I promise to only keep things on a need-to-know basis for this demonstration. To get a better look at the webpage’s underlying code, you can simply right-click anywhere on the webpage and select ‘Inspect’. This will pull up a Developer Tools window that contains detailed information about what is happening under the hood. It may look a bit different depending on your OS and browser, but it should look something like this (I’m using Windows Chrome):

The sheer amount of information can be a little overwhelming, but we want to focus on the html elements that can be found in the highlighted region:
This displays all the basic information contained on the webpage. The important thing to keep in mind is that html is written using tags, indicated by <> brackets. For example, a “header” section is usually denoted by the <head> tag. Within the <head> tag might just be a single picee of text, or it may have a series of other tags nested within it, depending on the complexity of the webpage. But everything between <head> and </head> (end tags include a ‘/’) is considered to be part of the <head> section.
As you can see by looking through the html on this page, the nested structures can get very large, very fast. Instead of searching through all the tags to find the information we need, we can get it directly by right-clicking the specific information we want and selecting ‘Inspect’. Since I want the boxscores, I will right click the “Phoenix Suns Basic and Advanced Stats” title here:
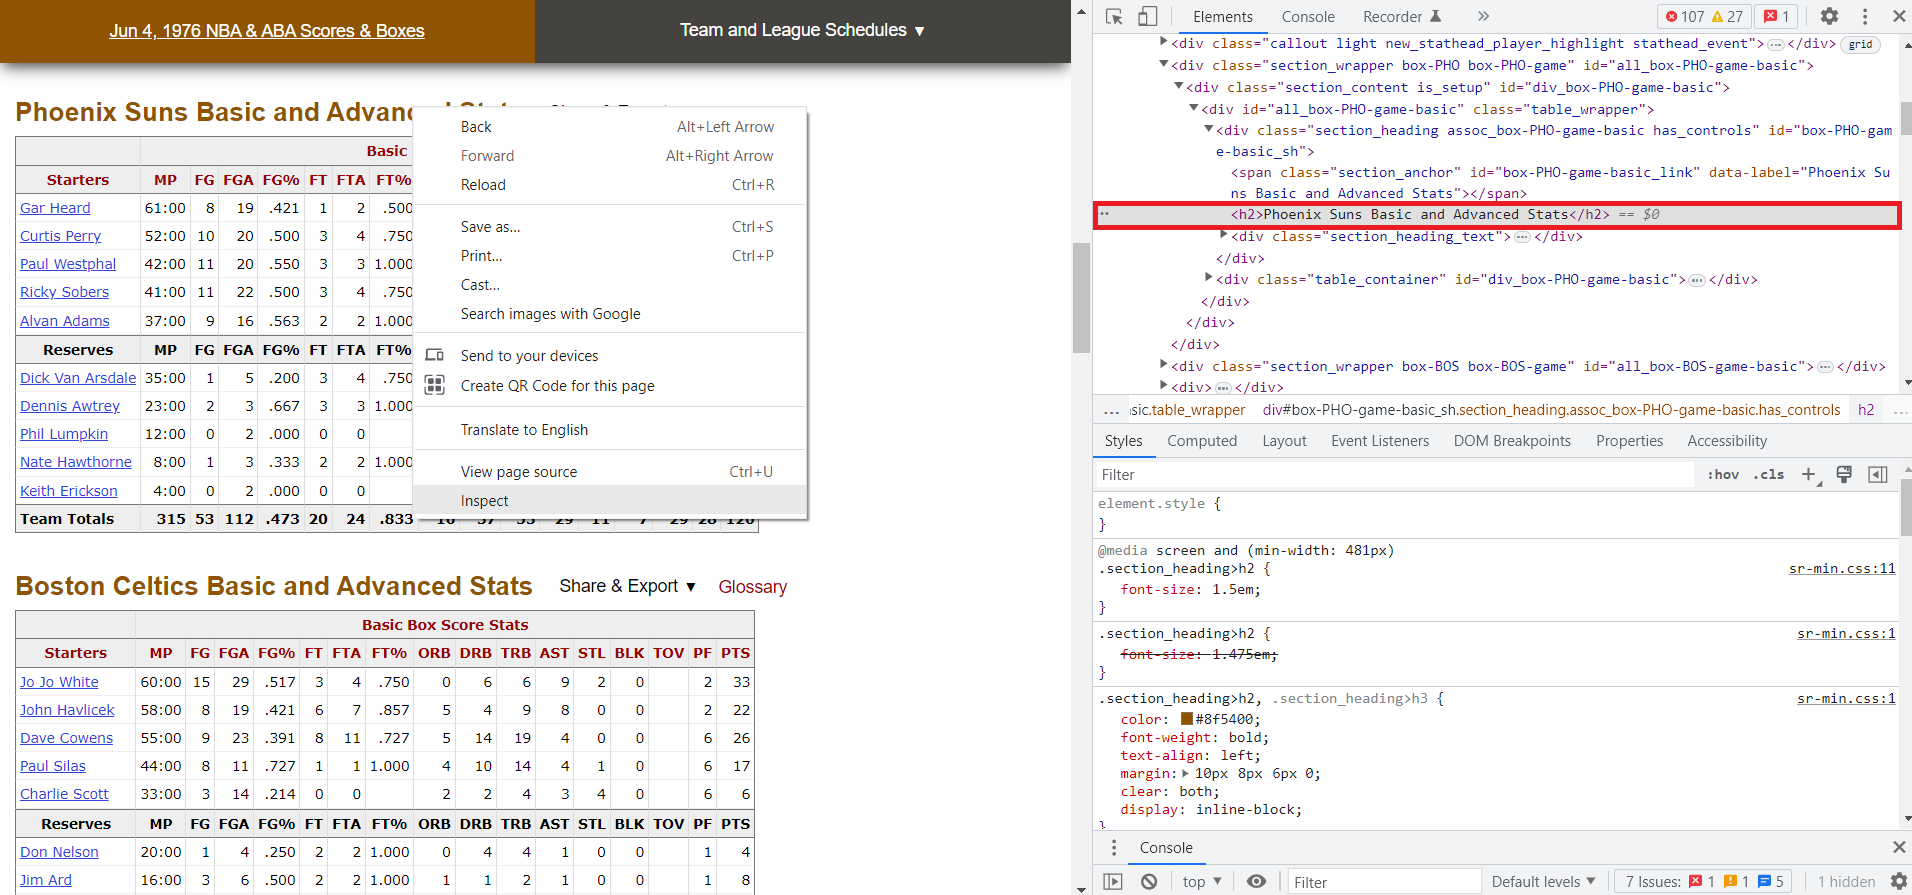
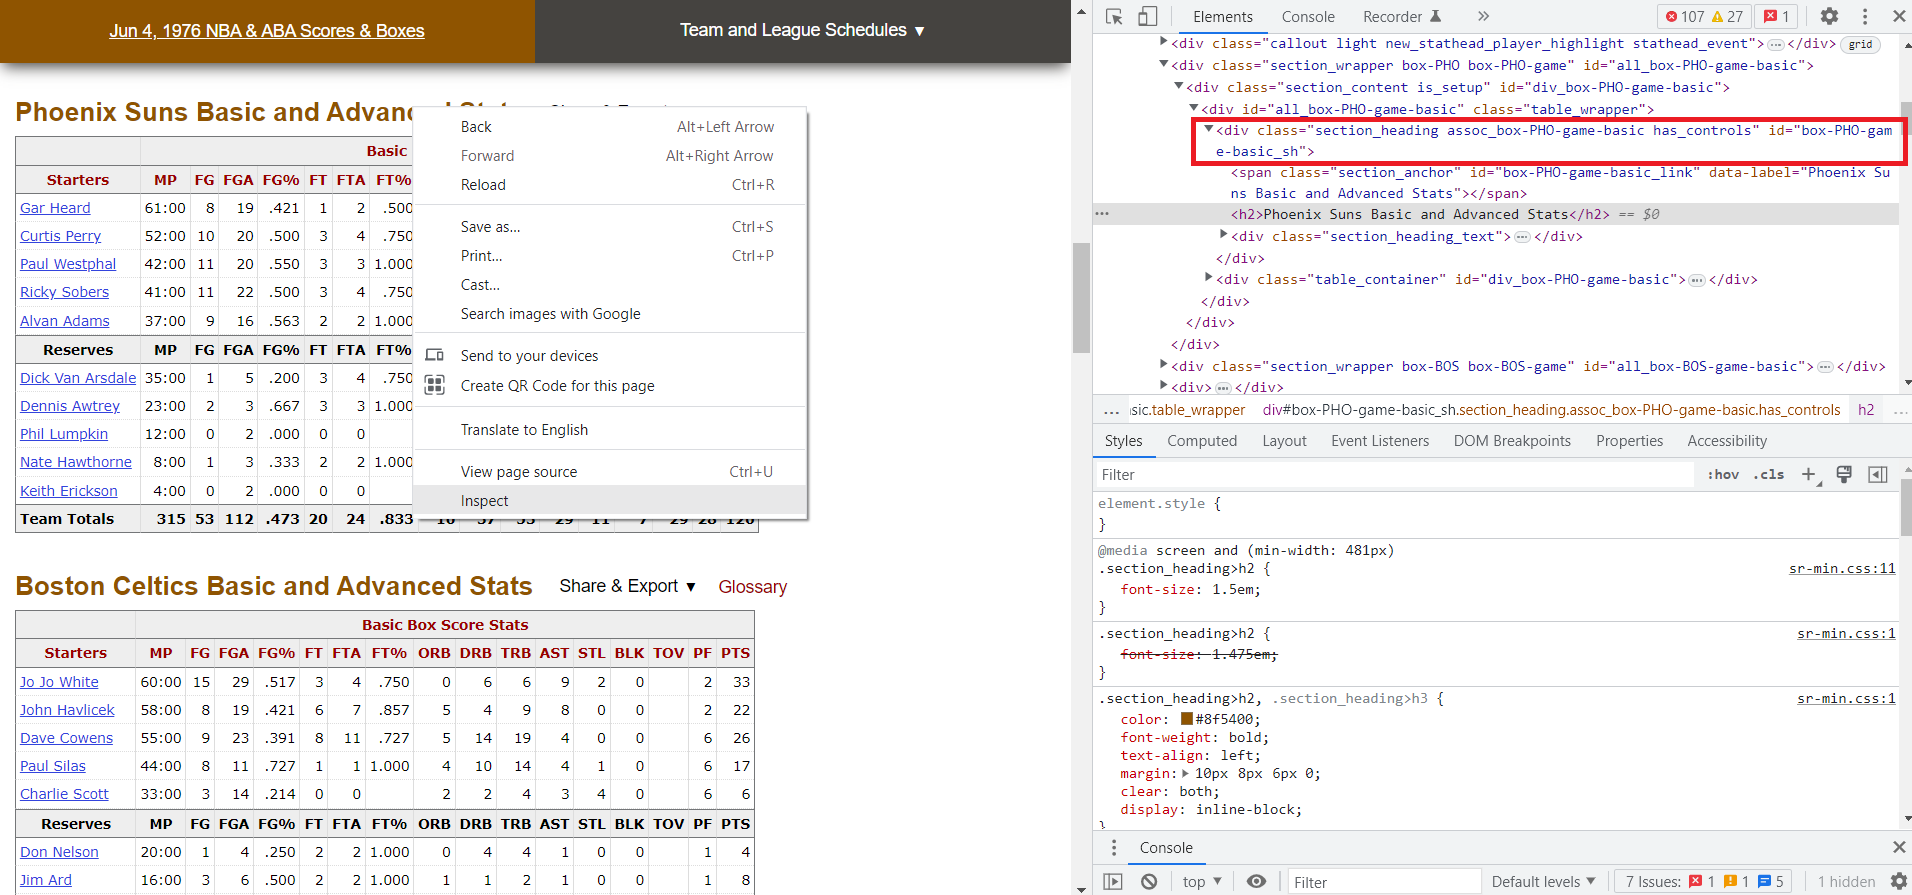
This time, notice how the Developer Tools window shows us the exact html element that corresponds to the title we clicked on. The title is within an <h2> tag, which is within a <div> tag. The <div> tag is used to separate different divisions, or sections of the webpage. Also notice how the div tag has some specific attributes (class and id). These are used to easily distinguish and organize the various <div> elements:
Another great feature of the Developer Tools is that while you have the console open, if you hover your mouse over any of the html elements, the corresponding information will be highlighted in your browser. This makes it significantly easier to narrow down to exactly what you want. If you look at some of the elements near the title we inspected, you see that the actual table, which contains all the data we want, is actually in a different tag:
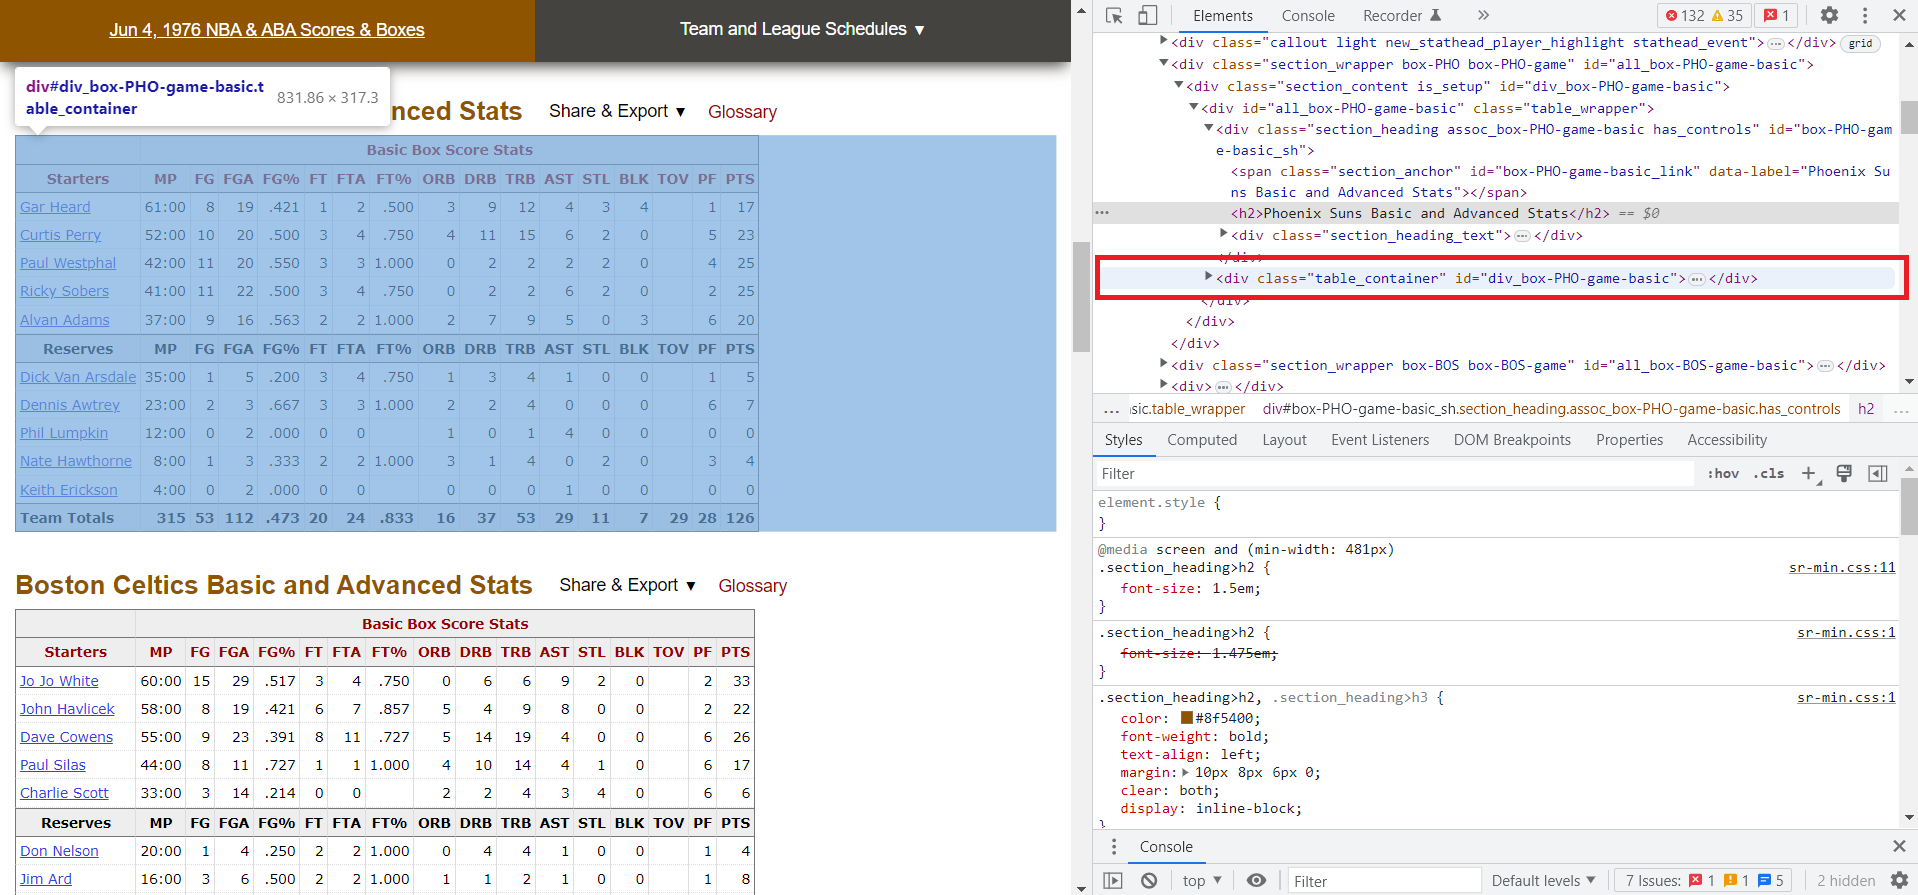
Opening the path for this <div> tag shows the table nested within, and within that, all the information in each cell, broken down by row and column. It should look something like this:
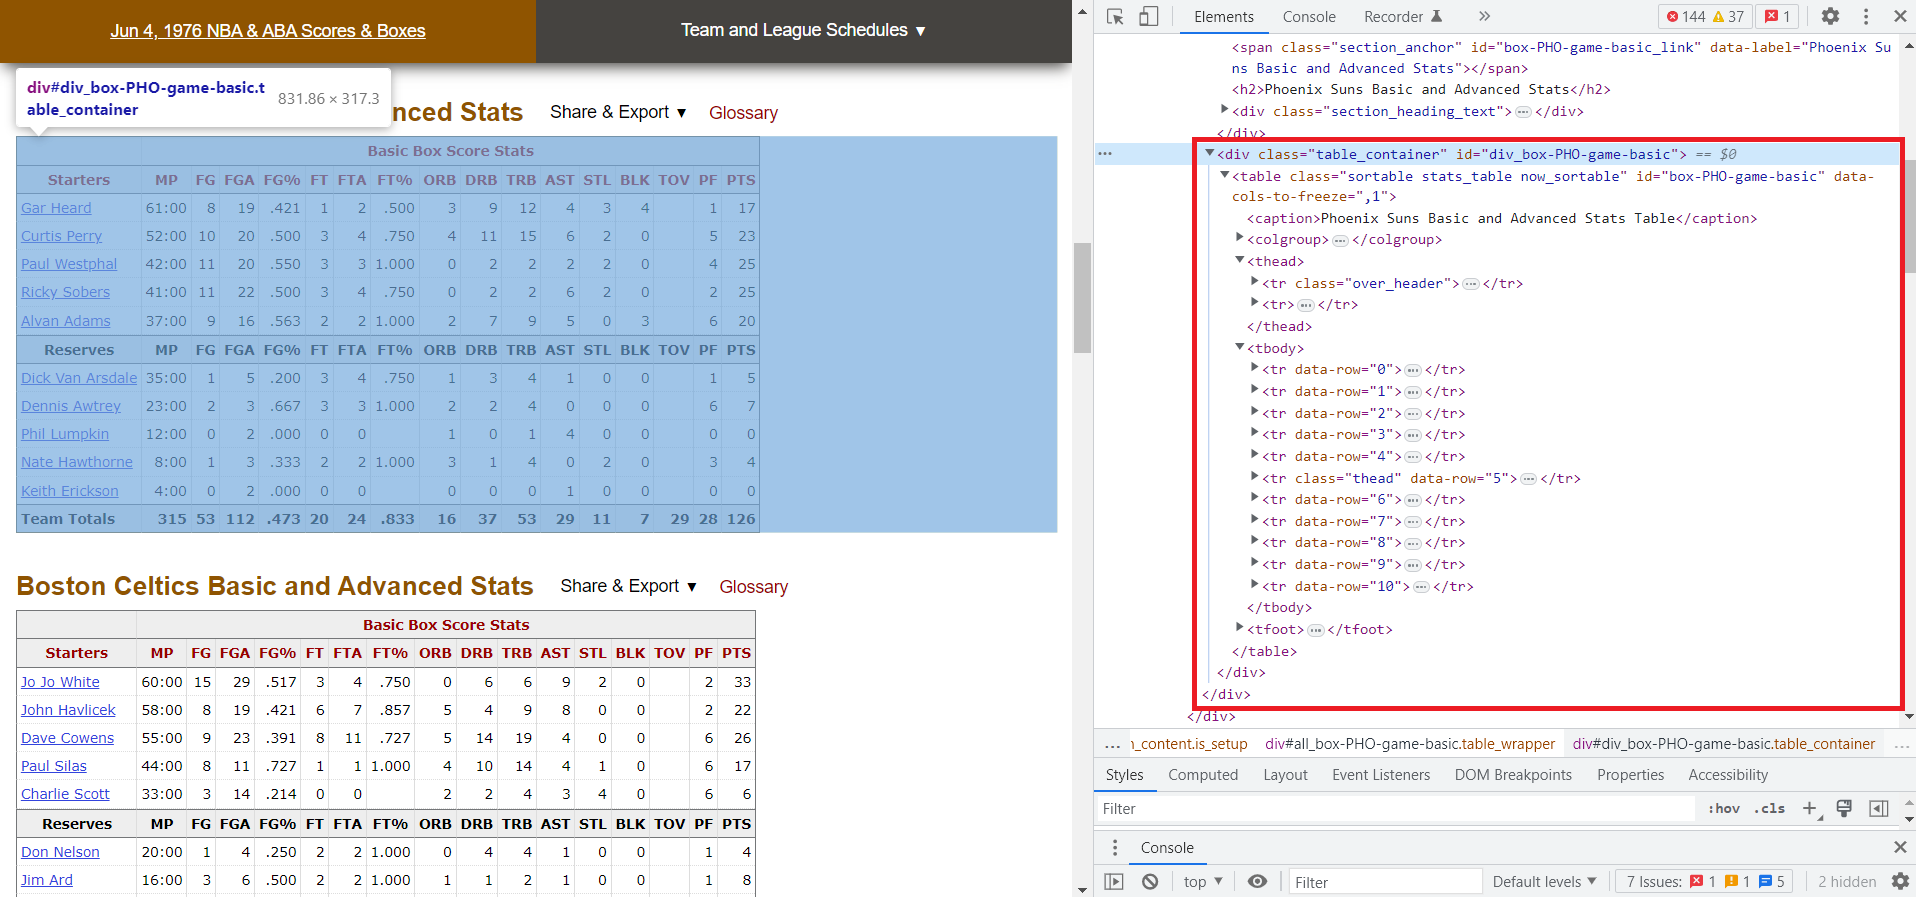
The important things to note are the various sections: <thead> contains the column headers, and <tbody> contains each <tr> (table row), and within each row is the individual <td> cells with the data. Now we know the exact html path for the data we need!
I can use Selenium to access the webpage by activating a driver. I am using Chrome as my web browser, but be sure to choose the right browser if you run this yourself:
driver = webdriver.Chrome()
This will open a seperate Chrome window that should be mostly blank with the message: “Chrome is being controlled by automated test software.” You now have a Chrome instance that you can control with your code. Next, open the url using the following lines of code:
url = 'https://www.basketball-reference.com/boxscores/197606040BOS.html'
driver.get(url)
Now the Chrome test window should be at the url we need. We can get the webpage data with the following line:
src = driver.page_source
And with that, we are done with Selenium for the time being. There are a lot of other great features that Selenium offers, like being able to interact with dynamic elements of a webpage such as clicking buttons, enter information into fields, and selecting items from a drop-down menu, but I will save those topics for a different time. Now we will switch to Beautiful Soup to pull out the information we need from the source code:
parser = BeautifulSoup(src, 'lxml')
Here, 'lxml' is telling Beautiful Soup that our webpage is either html or xml, and turns the webpage into a Beautiful Soup object that can be further manipulated. So what do we need now? There are 2 boxscore tables and I want to put the stats from each into a dataframe, so I need to pull out the column headers and each row of data. The tables, as a reminder, have the following html tags:
Phoenix: table class=”sortable stats_table now_sortable” id=”box-PHO-game-basic”
Boston: table class=”sortable stats_table now_sortable” id=”box-BOS-game-basic”
Here, we can see the the tag attributes are not identical. They have different ids, but the class is the same for each. If these two tables are the only ones with that class, things will be much simpler. Let’s check:
stat_tables = parser.findAll('table', attrs = {'class': 'sortable stats_table now_sortable'})
Here findAll() searches for every ‘table’ tag on the webpage where 'class' is equal to 'sortable stats_table now_sortable'. As it turns out, there are only 2 items in the list, and they are the two tables we need! Now let’s get the table data.
We need to get the column headers and cells. Looking at the nested tags within the table, I found that both the column headers and rows are in <tr> tags. The simplest method would be just to grab all <tr> elements within the table, but we need to make sure that there aren’t other <tr> elements that we accidentally grab as well. After looking around, it appears there is one unnecessary <tr> element in the table header, but since it is the first one, it should be fairly easy to account for. Let’s pull all <tr> elements from the first table and see what happens:
rows = stat_tables[0].findAll('tr')
Looking at the results, the very first element in the list is an ‘overheader’ column, but the rest of them appear to be exactly what we want. Let’s ignore the first element this time:
rows = stat_tables[0].findAll('tr')[1:]
The first row is now our column headers, but they are mixed with a bunch of other html stuff that we aren’t interested in. The first row looks like this:
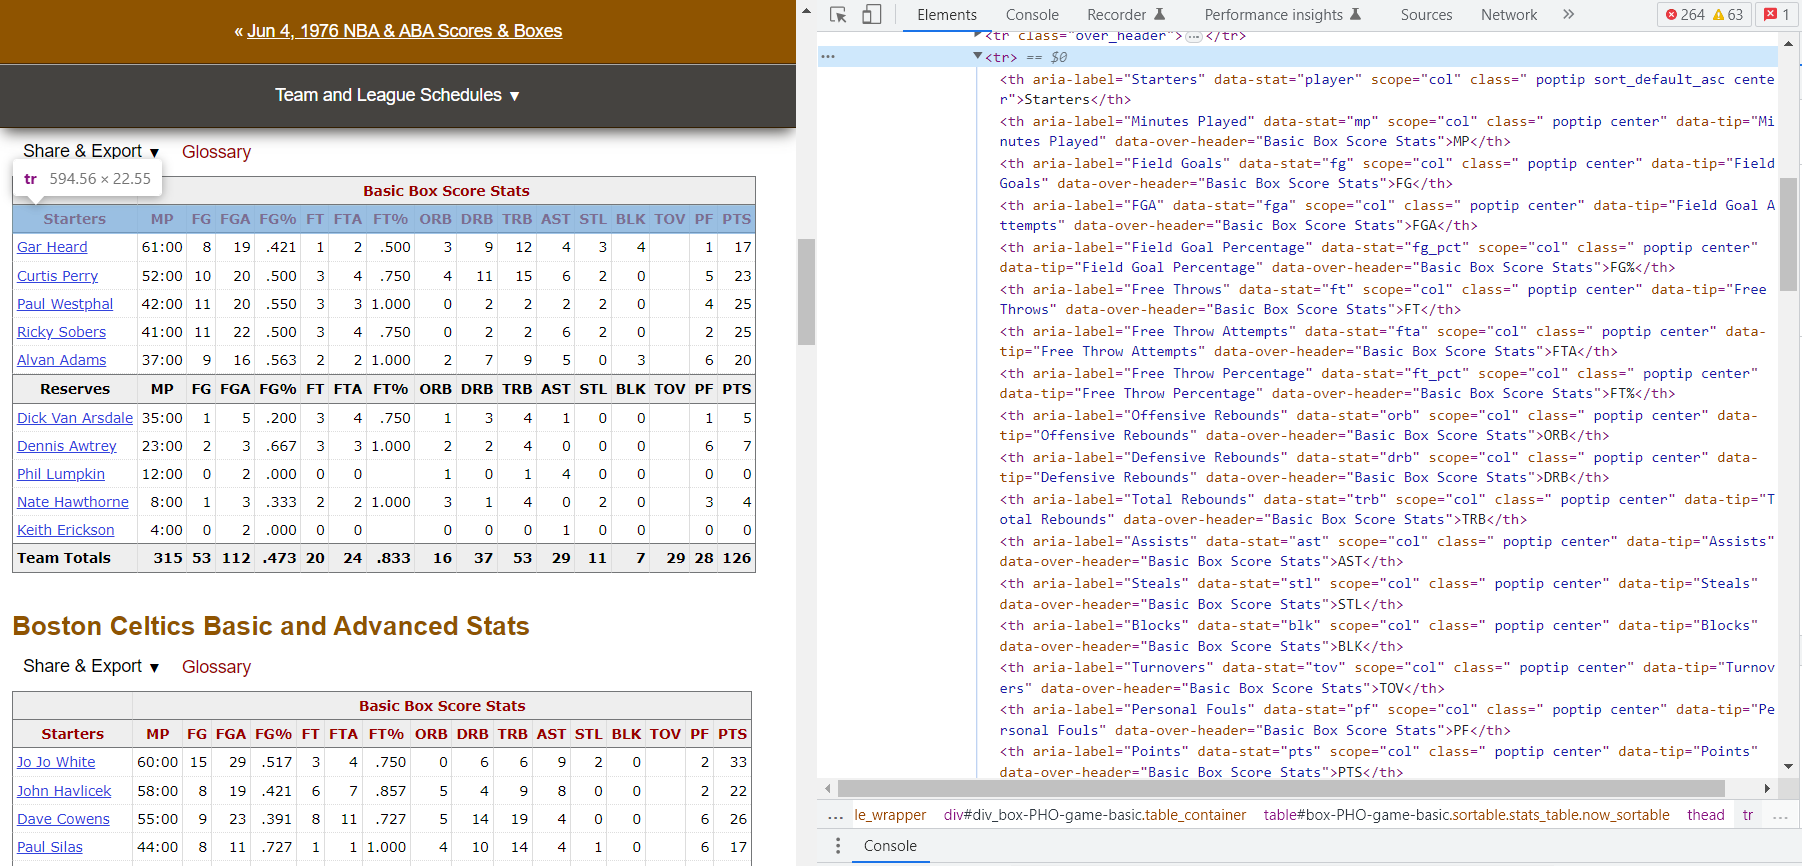
How do we pull out the strings we need? Let’s look at the following code:
headers = rows[0].findAll('th')
headerlist = [h.text.strip() for h in headers]
The code above first pulls out each individual column header, which are the <th> elements in the first row. We can get the raw string by converting the <th> element with the .text method, resulting in a list like this:
['Starters', 'MP', 'FG', 'FGA', 'FG%', 'FT', 'FTA', 'FT%', 'ORB', 'DRB', 'TRB', 'AST', 'STL', 'BLK', 'TOV', 'PF', 'PTS']
Perfect. Now for the rows of data. Let’s look at the first row:
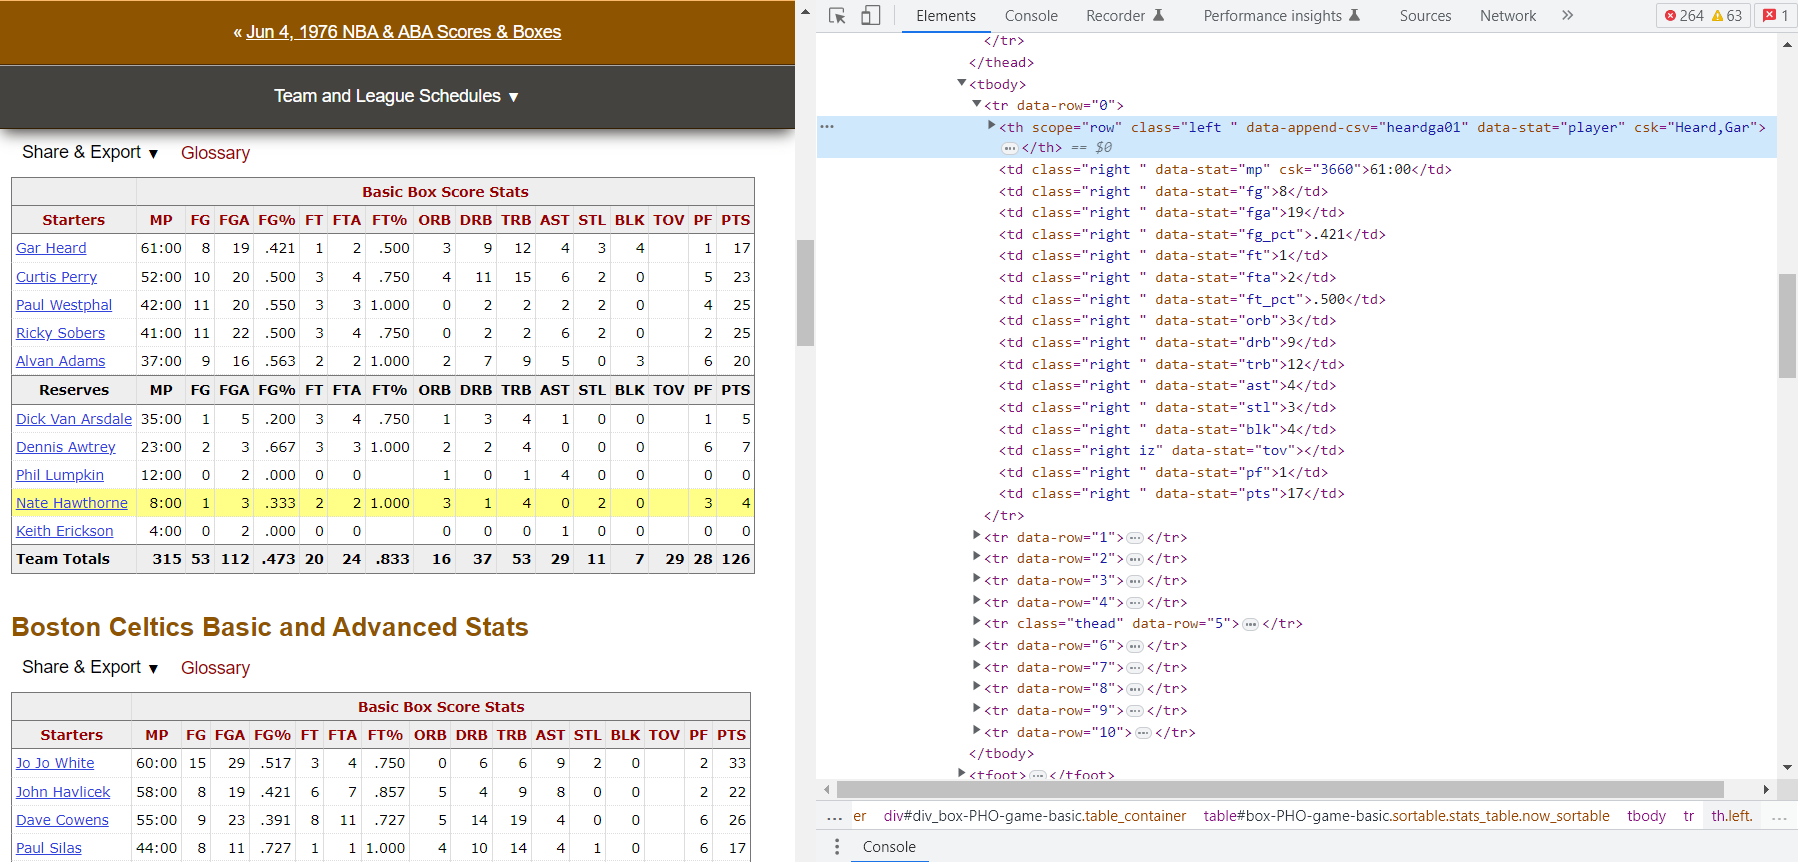
Here we see another complication. The player name is in an element within a <th> element, but the stats are all in <td> elements. There are a few ways to approach this, but I will pull out the player names and put them in their own list, then put the rows of data in a separate list. I can combine them later on.
data = rows[1:]
# get names column
player_names = [row.find('th').text.strip() for row in rows]
# get player stats
player_stats = [[stat.text.strip() for stat in row.findAll('td')] for row in data]
Now that everything has been trimmed down to just the raw data, it is straightforward enough to clean and put it all together in a dataframe:
for i in range(len(player_stats)):
    # ignore header with i+1
    player_stats[i].insert(0, player_names[i+1])

# create player stats dataframe
player_box_df = pd.DataFrame(player_stats, columns=headerlist)
# drop 'Reserves' row
player_box_df.drop(player_box_df[player_box_df['Starters'] == 'Reserves'].index, inplace=True)
player_box_df.rename(columns={'Starters':'Players'}, inplace=True)
And here is the result:
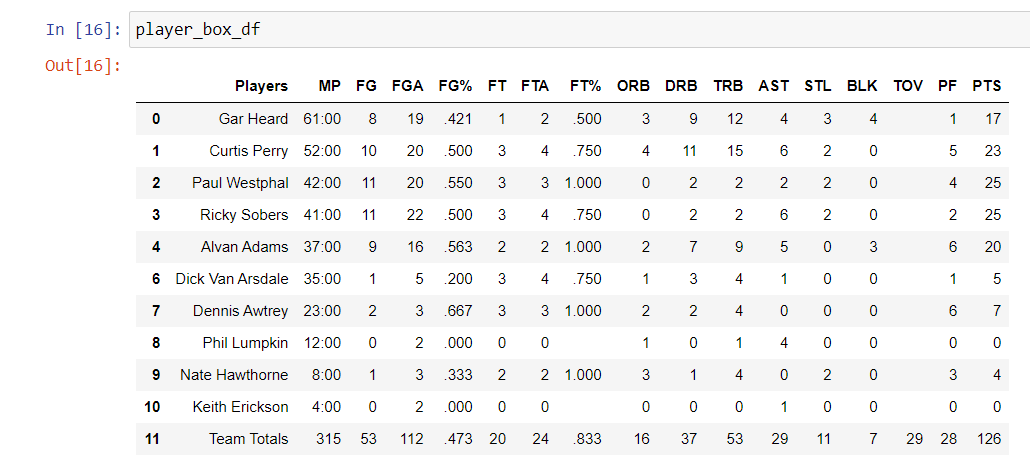
Of course, this is only for one team. The next step would be to write some functions and loop them so that the code will automatically create and reformat the data as needed.
At this point, you might be thinking that transcribing the 2 boxscores by hand would have probably taken less time. And you would be right. But the real power of web scraping comes from automation of large tasks. Once the code is written to get data from a single webpage, it can be scaled up to include thousands of webpages with relative ease. Next time I will take a look at how to effectively scale up your web scraper. Let me know what you think!